
Kakao Developers
카카오 API를 활용하여 다양한 어플리케이션을 개발해보세요. 카카오 로그인, 메시지 보내기, 친구 API, 인공지능 API 등을 제공합니다.
developers.kakao.com
내 애플리케이션 만들기


나중에 페이지를 넘겨줄 URL주소이다 (생성할 예정)
인가코드를 받기위해 나중에 Redirect URL이 필요하다 그러니 따로 메모장에 기록해두자


카카오톡 로그 설정하는법
https://developers.kakao.com/docs/latest/ko/kakaologin/rest-api
Kakao Developers
카카오 API를 활용하여 다양한 어플리케이션을 개발해보세요. 카카오 로그인, 메시지 보내기, 친구 API, 인공지능 API 등을 제공합니다.
developers.kakao.com


다운받은 .png이미지를 프로젝트 static하위에 넣어준다.


<%@ page language="java" contentType="text/html; charset=UTF-8" pageEncoding="UTF-8"%>
<%@ include file="../layout/header.jsp"%>

<!-- /auth/loginProc <--- 이녀셕은 스프링이 알아서 처리 해줌 마법..아니라
.loginProcessingUrl("/auth/loginProc") 설정 되어 있음
   -->
<div class="container">
	<form action="/auth/loginProc" method="post">
		<div class="form-group">
			<label for="username">username:</label> <input type="text" class="form-control" placeholder="Enter usernmae" id="username" name="username"
				value="teco">
		</div>
		<div class="form-group">
			<label for="password">password:</label> <input type="password" class="form-control" placeholder="Enter password" id="password" name="password"
				value="asd123">
		</div>
		<button type="submit" id="btn--login" class="btn btn-primary">signIn</button>
		<a
			href="https://kauth.kakao.com/oauth/authorize?client_id=96d4b049c21c05bf7f9d3995dad3c0c6&redirect_uri=http://localhost:9090/auth/kakao/callback&response_type=code">
			<img alt="카카오로그인" src="/image/kakao_login_medium.png" width="78" height="38"></a>
	</form>
</div>

<%@ include file="../layout/footer.jsp"%>
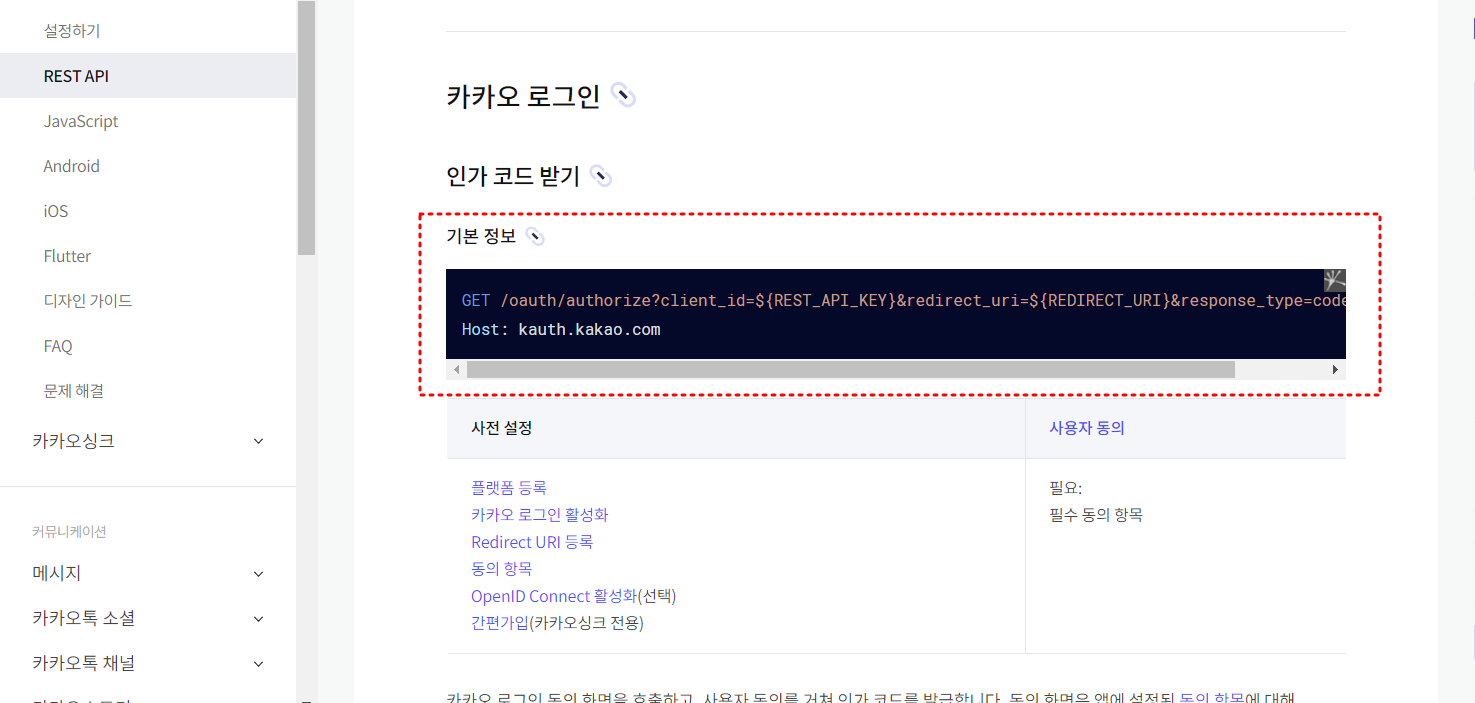
인가코드 요청하여 응답받기
a태그에 감싸저있는 로그인 로그를 눌렀을때 카카오서버에서 인가코드를 받아 와야한다 받아오는 방법을 알아보자
https://developers.kakao.com/docs/latest/ko/kakaologin/rest-api
Kakao Developers
카카오 API를 활용하여 다양한 어플리케이션을 개발해보세요. 카카오 로그인, 메시지 보내기, 친구 API, 인공지능 API 등을 제공합니다.
developers.kakao.com
Redirect URL : http://localhost:9090/auth/kakao/callback
Rest API : a079bf91e07fa4a3e19910c2171b5984
${REST_API_KEY} --> a079bf91e07fa4a3e19910c2171b5984 (치환)
${REDIRECT_URI} --> http://localhost:9090/auth/kakao/callback (치환)
치환전
https://kauth.kakao.com/oauth/authorize?client_id=${REST_API_KEY}&redirect_uri=${REDIRECT_URI}&response_type=code
치환후
https://kauth.kakao.com/oauth/authorize?client_id=a079bf91e07fa4a3e19910c2171b5984&redirect_uri=http://localhost:9090/auth/kakao/callback&response_type=code
치환이 된걸 a태그에 href속성에 넣어주면된다. 그럼 카카오서버로 넘어가서 인가코드를 요청을하여 응답을 받을 수 있다.


인가코드 발급받아주는 주소 : Redirect URL
그럼 카카오서버에서는 href에 묻어있는 Redirect URL와 Rest API를 확인후 인가코드를 발급하여 응답을 해주게된다.
응답을해줄때는 Redirect URL(http://localhost:9090/auth/kakao/callback)로 응답을해준다.
그럼 User를 담당하는 Controller로 넘어가서 인가코드를 받아주면된다.

여기까지가 인가코드를 요청하여 발급받는 설명이다.
인가코드를 받았다면 그다음으로 해야될게 토큰을 발급을 받아줘야한다.
package com.tencoding.blog.controller;


import javax.servlet.http.HttpSession;

import org.springframework.beans.factory.annotation.Autowired;
import org.springframework.http.HttpEntity;
import org.springframework.http.HttpHeaders;
import org.springframework.http.HttpMethod;
import org.springframework.http.ResponseEntity;
import org.springframework.stereotype.Controller;
import org.springframework.util.LinkedMultiValueMap;
import org.springframework.util.MultiValueMap;
import org.springframework.web.bind.annotation.GetMapping;
import org.springframework.web.bind.annotation.RequestParam;
import org.springframework.web.bind.annotation.ResponseBody;
import org.springframework.web.client.RestTemplate;

import com.tencoding.blog.dto.OAuthToken;

@Controller
public class UserController {

	@Autowired
	HttpSession session;

	@GetMapping("/auth/login_form")
	public String loginForm() {
		return "user/login_form";
	}

	@GetMapping("/auth/join_form")
	public String joinForm() {
			return "user/join_form";
	}

	@GetMapping("/user/update_form")
	public String updateForm() {

		return "user/update_form";
	}

	// 페이지에서 데이터를 리턴하는 방법

	@GetMapping("/auth/kakao/callback")
	@ResponseBody // data를 리턴함
	public OAuthToken kakaoCallback(@RequestParam String code) {
		// 여기서 카카오 서버에서 보내준 code 값을 받을 수 있다.
		// 다음 단계는 토큰 발급 받기


		//https://kauth.kakao.

		RestTemplate rt = new RestTemplate();

		// 헤더 만들기
		HttpHeaders headers = new HttpHeaders();
		headers.add("Content-type", "application/x-www-form-urlencoded;charset=utf-8");

		// 바디 만들기
		MultiValueMap<String, String> params = new LinkedMultiValueMap<>();
		params.add("grant_type", "authorization_code");
		params.add("client_id", "96d4b049c21c05bf7f9d3995dad3c0c6");
		params.add("redirect_uri", "http://localhost:9090/auth/kakao/callback");
		params.add("code", code);

		HttpEntity<MultiValueMap<String, String>> requestKakaoToken = new HttpEntity<>(params,headers);
		// 헤더 변조 해서 실행 시키는 메소드 RestTemplate exchange()이다.
		ResponseEntity<OAuthToken> response = rt.exchange("https://kauth.kakao.com/oauth/token",
				HttpMethod.POST,
				requestKakaoToken,

				OAuthToken.class);
		/////// 여기까지 토큰 받기 완료 ///////////

		// 다시 한번더 kapi.kakao.com로 토큰을 가지고 요청하여 사용자 정보를 응답 받아야 한다.

		return response.getBody();
	}


}
토큰 발급 받는 방법
먼저 몇개 알아야할 클래스가 있다.
RestTemplate란
https://zico8282.tistory.com/entry/%EC%8A%A4%ED%94%84%EB%A7%81-RestTemplate
스프링 RestTemplate
RestTemplate란 Spring에서 지원하는 객체로 간편하게 Rest 방식 API를 호출할 수 있는 Spring 내장 클래스입니다. Spring 3.0부터 지원되었고, json, xml 응답을 모두 받을 수 있습니다. Rest API 서비스를 요청
zico8282.tistory.com

package com.tencoding.blog.controller;


import javax.servlet.http.HttpSession;

import org.springframework.beans.factory.annotation.Autowired;
import org.springframework.http.HttpEntity;
import org.springframework.http.HttpHeaders;
import org.springframework.http.HttpMethod;
import org.springframework.http.ResponseEntity;
import org.springframework.stereotype.Controller;
import org.springframework.util.LinkedMultiValueMap;
import org.springframework.util.MultiValueMap;
import org.springframework.web.bind.annotation.GetMapping;
import org.springframework.web.bind.annotation.RequestParam;
import org.springframework.web.bind.annotation.ResponseBody;
import org.springframework.web.client.RestTemplate;

import com.tencoding.blog.dto.OAuthToken;

@Controller
public class UserController {

	@Autowired
	HttpSession session;

	@GetMapping("/auth/login_form")
	public String loginForm() {
		return "user/login_form";
	}

	@GetMapping("/auth/join_form")
	public String joinForm() {
			return "user/join_form";
	}

	@GetMapping("/user/update_form")
	public String updateForm() {

		return "user/update_form";
	}

	// 페이지에서 데이터를 리턴하는 방법
	@GetMapping("/auth/kakao/callback")
	@ResponseBody // data를 리턴함
	public OAuthToken kakaoCallback(@RequestParam String code) {
		// 여기서 카카오 서버에서 보내준 code 값을 받을 수 있다.
		// 다음 단계는 토큰 발급 받기


		//https://kauth.kakao.

		RestTemplate rt = new RestTemplate(); // Rest방식 API를 호출할 수 있는 내장 클래스 생성

		// 헤더 만들기
		HttpHeaders headers = new HttpHeaders();
		headers.add("Content-type", "application/x-www-form-urlencoded;charset=utf-8"); // content타입 설정

		// 바디 만들기
		MultiValueMap<String, String> params = new LinkedMultiValueMap<>(); // 만들어진 header와 body를 가진 HttpEntity 객체 생성
		params.add("grant_type", "authorization_code");
		params.add("client_id", "96d4b049c21c05bf7f9d3995dad3c0c6");
		params.add("redirect_uri", "http://localhost:9090/auth/kakao/callback");
		params.add("code", code);

		HttpEntity<MultiValueMap<String, String>> requestKakaoToken = new HttpEntity<>(params,headers);
		// 헤더 변조 해서 실행 시키는 메소드 RestTemplate exchange()이다.
		ResponseEntity<OAuthToken> response = rt.exchange("https://kauth.kakao.com/oauth/token",
				HttpMethod.POST,
				requestKakaoToken,

				OAuthToken.class);
		/////// 여기까지 토큰 받기 완료 ///////////

		// 다시 한번더 kapi.kakao.com로 토큰을 가지고 요청하여 사용자 정보를 응답 받아야 한다.

		return response.getBody();
	}


}
OauthToken (토큰값을 받아줄 dto)

package com.tencoding.blog.dto;

import java.util.HashMap;
import java.util.Map;

import com.fasterxml.jackson.annotation.JsonAnyGetter;
import com.fasterxml.jackson.annotation.JsonAnySetter;
import com.fasterxml.jackson.annotation.JsonIgnore;
import com.fasterxml.jackson.annotation.JsonInclude;
import com.fasterxml.jackson.annotation.JsonProperty;
import com.fasterxml.jackson.annotation.JsonPropertyOrder;

@JsonInclude(JsonInclude.Include.NON_NULL)
@JsonPropertyOrder({ "access_token", "token_type", "refresh_token", "id_token", "expires_in", "scope",
		"refresh_token_expires_in" })
public class OAuthToken {

	@JsonProperty("access_token")
	public String accessToken;
	@JsonProperty("token_type")
	public String tokenType;
	@JsonProperty("refresh_token")
	public String refreshToken;
	@JsonProperty("id_token")
	public String idToken;
	@JsonProperty("expires_in")
	public Integer expiresIn;
	@JsonProperty("scope")
	public String scope;
	@JsonProperty("refresh_token_expires_in")
	public Integer refreshTokenExpiresIn;
	@JsonIgnore
	private Map<String, Object> additionalProperties = new HashMap<String, Object>();

	@JsonAnyGetter
	public Map<String, Object> getAdditionalProperties() {
		return this.additionalProperties;
	}

	@JsonAnySetter
	public void setAdditionalProperty(String name, Object value) {
		this.additionalProperties.put(name, value);
	}

}
'개발일지 > 스프링' 카테고리의 다른 글
| spring boot 댓글 삭제기능 (0) | 2022.12.19 |
|---|---|
| XSS 예방 (1) | 2022.12.19 |
| 스프링 RestTemplate (0) | 2022.12.15 |
| JPA 네이밍전략, 네이티브 쿼리 사용하기 (0) | 2022.12.12 |
| Spring Boot 회원가입 샘플 기능 만들어보기 (0) | 2022.12.08 |

댓글